How to Choose, Mount, and Use an Off-Road Jack
One of the most important pieces of safety and recovery equipment on your customized truck or SUV is your off-road jack. Your vehicle probably came with a jack that’s meant to help in the event of a roadside emergency. When you’re far from the nearest road, however, it may not be up to the job. If you’ve lifted your vehicle as part of its customization, the jack may not even be physically capable of lifting the tires off the ground. Aftermarket options, like Hi-Lift jacks, can help make sure you can change a flat, but the right jack can also do so much more.
The Right Tool for the Right Job
When it comes to picking an off-road jack, it’s important to understand that different types of jacks have different capabilities. While it’s tempting to think of them in terms of changing a flat, the reality is that wheeling is a challenging sport where the need to lift the vehicle’s wheels or chassis comes up far more often than the need for new rubber does. In addition, some jacks give you extra utility during recovery, no lifting needed. You’ll usually see five different types of jacks out in the field.
- Scissor - This is the type of jack that most often comes stock with the vehicle, and seeing it used off-road is rare for a couple of reasons. The simple design sees a threaded rod connecting opposite sides of the jack mechanism, drawing them closer together as it’s tightened and, in turn, lifting the wheel. It has a relatively low weight capacity, poor force multiplication to aid the lift, and a lower maximum height.
- Bottle - The hydraulic bottle jack is another common stock jack for some vehicles, but it makes a fairly handy off-road jack. Models are available with a heavier weight rating and higher lifting maximums to manage lifted off-road vehicles and their load-outs. The upright design can make it hard to get under the vehicle if space is tight, necessitating a dig-out in some instances before you can lift your rig.
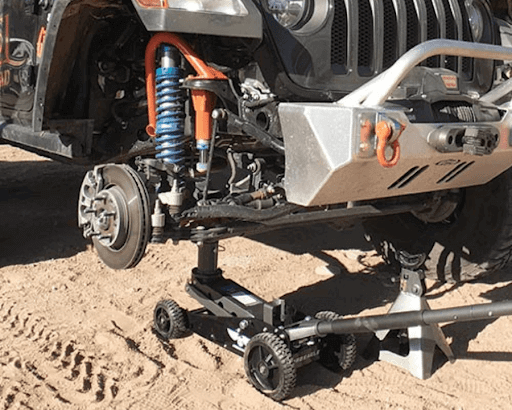
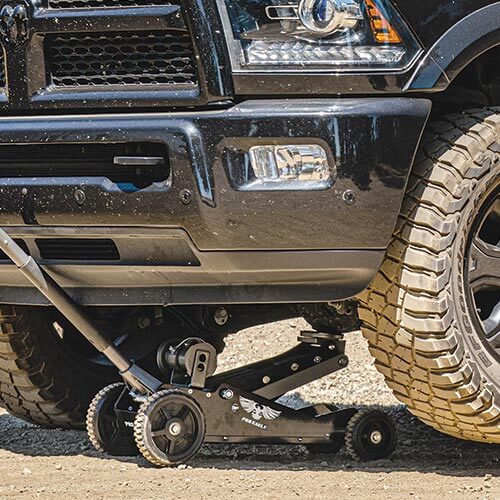 Trolley - These look like the standard floor jacks you have at home in the garage but beefed up for off-road use. Featuring a hydraulic cylinder that is mounted on lifting arms where it can pivot and lift, it offers an enormous weight capacity and generous height while sitting somewhat lower than bottle jacks. You still may find yourself digging to create space, but its wider footprint may provide better support on slightly softer ground.
- Beam - The most popular (and most copied) version of this off-road jack is the popular Hi-Lift Jack. These powerful recovery tools can lift the vehicle via aftermarket bumpers, rock sliders, or hard points, providing a massive weight capacity and huge lift other jacks struggle to match. It can even be used as a manual winch, parts clamp, or to straighten out crumpled racks or cages. It also happens to be one of the most dangerous jacks on the market if misused.
- Exhaust - Rather than using mechanical leverage or hydraulic power, these inflatable jacks use your vehicle’s exhaust to lift the vehicle for tire changes or to create space for traction boards or taller jacks. While they excel on soft, sloppy terrain that would dig in other off-road jacks, a puncture could be a real letdown that ruins your jack while leaving you stranded.
Choosing the Right Off-Road Jack
When selecting the right jack for your vehicle, it’s important to know that there isn’t a reason to limit yourself to a single option. You’ve got a large powerhouse that’s built to face a variety of tough off-roading conditions, and many off-roaders will carry two or even three different types of jacks to make sure they have the tool they need when it’s called for. They may have the scissor jack that came with their vehicle, a Hi-Lift jack for winching and chassis lifting, and an emergency exhaust jack for muddy or snow-covered terrain that needs a larger area of ground contact with a short profile that can slip into tighter spaces.
Look for an off-road jack rated to handle your GVWR–Gross Vehicle Weight Rating–or the absolute maximum your vehicle is supposed to weigh when it’s loaded down with people and cargo. The GVWR can be found on the information panel inside the driver’s side door. Since it’s unlikely the jacks you’re looking at will exactly match this number, you’ll err on the side of caution and choose a jack that has a capacity higher than the GVWR. While a lower-rated jack may work to lift a wheel for a tire change under ideal conditions, it won’t be as safe, and how often do you actually see those ideal conditions off the road?
Mounting Your Jack
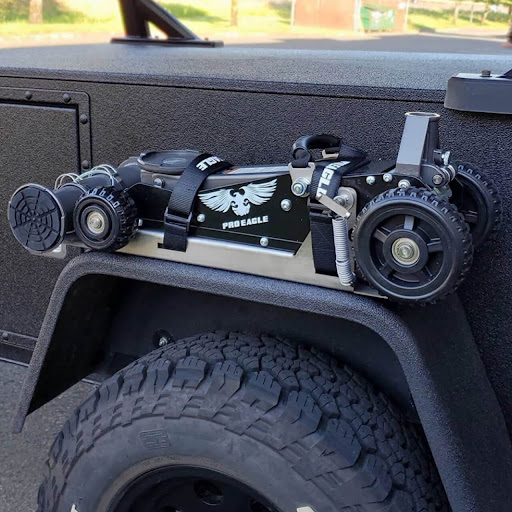 Aside from exhaust jacks, off-road jacks tend to be fairly heavy, making them an item you don’t want bouncing around in the cargo or passenger area of your vehicle. Your vehicle probably has a mounting point built in for your stock jack, but aftermarket jacks also need to be secured. Exhaust jacks usually come with a storage bag that lays almost flat and can be carried easily in the cab or cargo bay, but other off-road jack options have specialized mounts available to keep them secure.
A universal Hi-Lift Jack Mount mounts securely to flat surfaces, like a bumper, rack, or bed wall, to keep your beam jack stored safely where it can be found. Trolley jacks, like the options from Pro Eagle, which come in different weight ratings and have large wheels for outdoor use, can be mounted in a convenient cradle that’s perfect for above wheel wells or on racks where they securely hold the jack and handle. You also have the option of installing MOLLE panels for flexible gear and equipment storage. Available in a wide selection of sizes, these versatile systems let you secure gear using clamps, bolts, or straps, whatever its shape or size. Custom MOLLE panels are designed to fit the most popular off-road vehicles, giving you more effective storage options for your bed, cab, or cargo area.
Using Your Jack
The most important thing to remember about using your jack is that when lifting an off-road truck or SUV, you’re moving a big chunk of metal, glass, and rubber that is meant to keep four points of contact with the ground (that’s why you upgraded your suspension for extended travel), creating a huge amount of potential energy that will hurt you and your vehicle if you don’t respect it. Always place your jack on the most stable and flat ground possible, use your parking brake, and chock your wheels to minimize the potential of the load shifting. Go slow, and when in doubt, gently lower it and try resetting the jack position for another go.
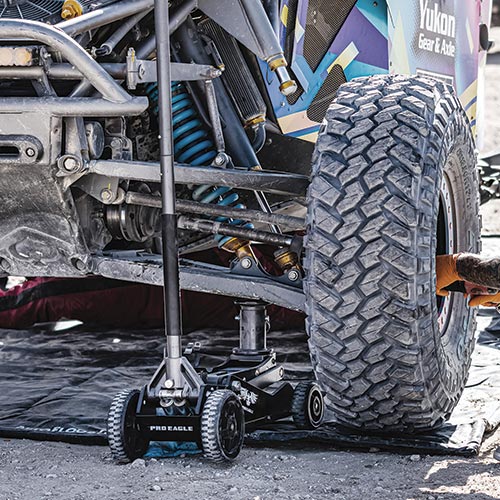 Scissor, Trolley, and Bottle Jacks - These jacks are designed to lift your vehicle using manufacturer-identified jacking points. For stock vehicles, there are often notches in the chassis marking where it has been fixed to the frame, but with larger 4X4 vehicles, especially lifted and modified ones, these may not be sufficient to create clearance under the wheels. In these cases, the jack is usually placed with the jacking pad under the differential or on a specially reinforced flat area just to the side of it. Refer to your owner’s manual ahead of time for model-specific information.
Position the jack and extend it by hand until it is almost touching the vehicle. Then attach the handle. For scissor jacks, turning the handle will lift the pad into contact with the vehicle and begin jacking up the vehicle. For bottle and trolley jacks, pushing the handle down and then raising it repeatedly will use hydraulic force to lift the pad and raise the vehicle. On firm, flat surfaces, all three of these styles are stable, but for extended lifts, jack stands should be used for safety. Lowering the vehicle is done by using the handle to turn the other direction on scissor jacks or to turn the pressure release valve on hydraulic models.
Exhaust Jacks - Turn your vehicle off and remove your exhaust jack from its storage bag. Slide it under the side of the vehicle you need to lift between the wheels, closest to the tire you need to change or create traction under. The bottom of your exhaust jack has cleats to help it grip the soft ground and avoid slipping out from under the vehicle. Place the jacking pad on top of the exhaust jack and attach the included hose. The other end of the hose fixes onto the exhaust pipe of your vehicle. Double-check that both ends of the hose are secure, then turn on your engine. The exhaust vapors will inflate the jack, lifting it. Once ready, deflating is accomplished either via a valve or by removing the hose to allow the trapped gasses to escape. Avoid breathing in these fumes.
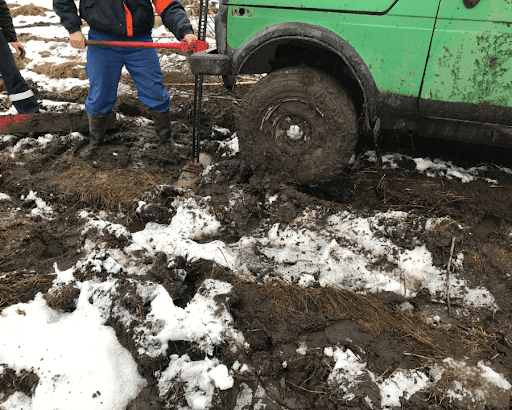 Hi-Lift Jacks - The bad boys of off-road jacks–with Hi-Lift beam jacks, you get a higher lift with more energy potential stored, meaning that with that lift comes a greater need for caution. The base of the jack must be firmly planted on solid, flat ground and the I-beam positioned perpendicular to the ground. Safety devices are designed to help your Hi-Lift attach more securely to the bumper, attach it directly to a wheel to lift it up to create traction, or provide a larger base for increased stability on softer surfaces. Make use of them when you can. The Hi-Lift is a simple mechanical jack that uses two climbing pins moving along a central beam, their action controlled by the motion of the jack handle, to lift an object on the large runner. A reverse latch allows you to switch the direction of these climbing pins to lower the vehicle when it’s time.
Position the jack on firm ground next to the bumper, hard point, rock slider, or lifting accessory you’re going to use for the lift. With the handle against the beam, slide the runner up until it makes contact with the lifting surface. Pull the jack handle down until the rising pin clicks into the next hole up the beam, then return the handle to its upright position, moving the lower pin up to its next beam hole. As you’re lifting your vehicle, use a double underhand palm-up grip, and don’t stand over the jack handle. This is where the majority of injuries occur, either from dislocated digits or chest and head injuries from a steel Hi-Lift jack handle–powered by thousands of pounds of truck that wants to fall–slamming into their body. Once the vehicle is lifted, be sure to avoid dislodging the jack and never get underneath an unsupported and secured vehicle.
When it’s time to lower the truck, engage the reverse latch and use the same motions. The downward motion lifts the vehicle slightly, allowing the lower pin to disengage and move downward, followed by the top pin. Remain clear of the handle, as an auto-ratcheting off-road jack handle is a force of destruction that has no respect for life or limb.
Hi-Lift Jack Winching - One of the reasons these off-road jacks are so popular is that they can operate as a manual winch. They provide straight-line force that can be used to pull you out of a tight spot or provide lateral stability to support your bumper-mounted winch during a pull on uneven terrain. Using a Hi-Lift winch kit, tow rope, or strap (not a recovery or snatch strap), secure the top clamp clevis to an immovable anchor, such as a tree or large boulder. The vehicle will be similarly hooked to the hole on the underside of the runner. As you use the jack, the same action that would lift the vehicle pulls instead along the beam.
Get Jacked
When you need off-roading equipment and accessories you can count on, we’ve got you covered with gear from the leading brands, in stock and ready to ship to your door. Call and talk to one of our specialists if you need more product information or build planning guidance. Order your off-road jack, mounts, and accessories from Offroad Alliance today.

